Drawing a nose that truly breathes life into a portrait isn't just about rendering a shape; it's about mastering the advanced techniques of shading, perspective, and exaggeration to capture its unique character and dimension. You're past the basic outlines, now it’s time to push your skills further, seeing the nose not as a static feature, but as a dynamic, sculptural form ready for expressive interpretation.
At a Glance: Key Takeaways for Advanced Noses
- Think 3D, Not 2D: Break the nose down into core geometric shapes (triangles, spheres, ovals) to understand its volume in space.
- Shading is Sculpting: Use layered light and shadow to define planes and create depth, focusing on subtle transitions rather than harsh lines.
- Perspective is Power: Map the nose's angles and use "plastic lines" to visualize its curvature and how it interacts with light in different orientations.
- Exaggeration Adds Expression: Learn to selectively amplify features to convey personality, emotion, or a specific style, from subtle tweaks to bold caricatures.
- Observation is Your Best Tool: Practice seeing how light falls on real noses and how their forms change with movement and expression.
- Patience Pays Off: Building up layers of shading and refining details takes time and a light hand.
Beyond Basic Lines: Seeing the Nose as a Sculptural Form
Before you even touch a blending stump or consider a unique angle, you need to shift your perception. Forget about drawing a "nose" as a single, flat entity. Instead, envision it as a complex, plastic object occupying space, capable of being rotated, lit, and exaggerated. This foundational mindset, seeing the nose as a series of interconnected forms rather than a single shape, is the bedrock of advanced rendering.
Think of the nose as a collection of basic geometric shapes, which serve as your structural scaffolding. Experts often recommend breaking it down into:
- Triangles: One main triangle from the bridge's top to the outer corners of the nostrils establishes the primary mass. Smaller, often shadowed triangles can be found between the nostrils and connecting the nostril edges to the bridge.
- Circles or Spheres: The tip of the nose is best understood as a sphere. This sphere is crucial for visualizing tonal values and how light wraps around the form. The bridge itself often forms a more elongated, oval shape, though this varies greatly by individual anatomy.
Understanding these underlying shapes clarifies the nose's planes and how light will interact with its structure. Begin with a light, structural sketch, establishing these core forms and their proportions before adding any detail. It's like a sculptor first blocking out their clay, ensuring the fundamental volume is correct.
Mastering Light & Shadow: The Art of Shading
Shading is where the nose truly comes alive, transitioning from a flat drawing to a three-dimensional form. This is often the most challenging aspect due to the nose's soft, continuous curves and subtle shifts in tone. The goal isn't just to add darkness, but to use light and shadow to sculpt.
The Light Map: From Broad Strokes to Nuance
Your first step in shading is to become a light detective. Identify the absolute lightest and darkest areas on your reference or imagined nose. This "light map" provides your tonal anchors.
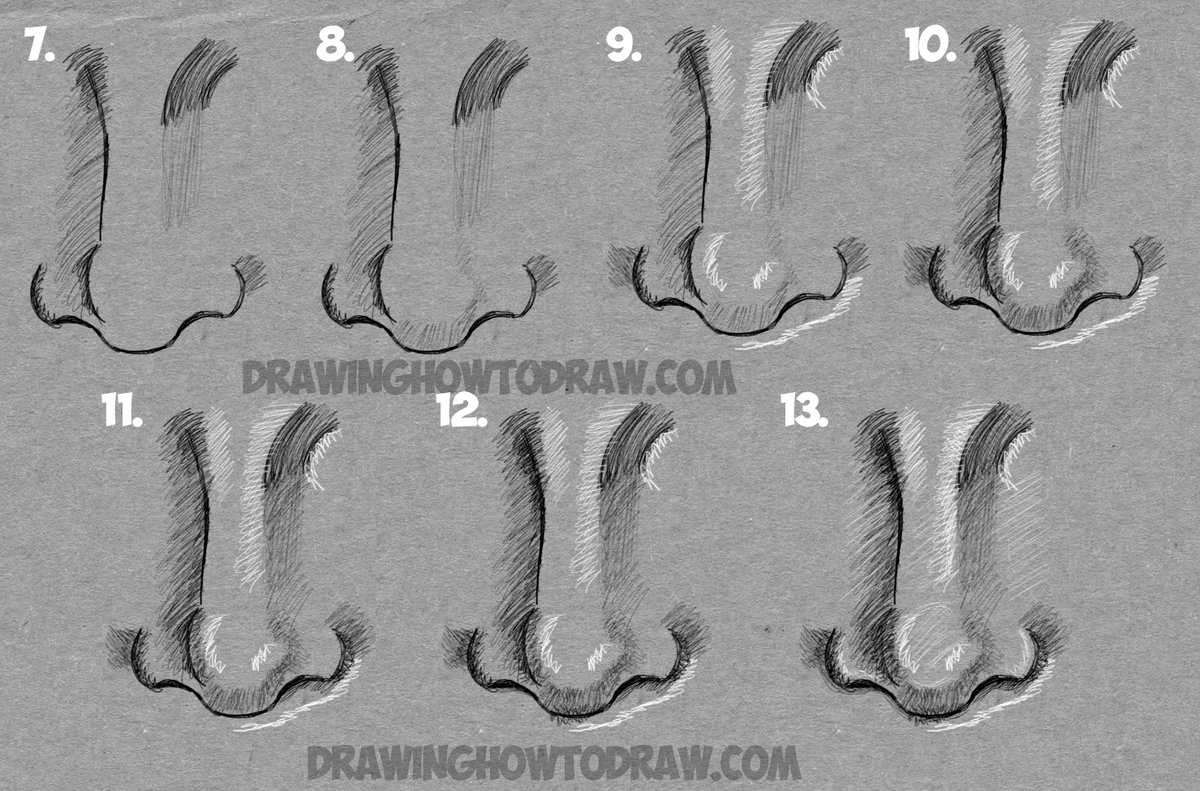
- Start Light, Build Dark: Begin by applying very light layers of tone to the lightest areas first, gradually building up darker shades. This multi-layered approach prevents you from going too dark too fast and allows for smoother transitions. Think of it as painting with graphite or charcoal – thin washes first, then richer colors.
- Smooth Transitions are Key: The nose rarely has harsh, defined edges where light meets shadow. Skin is smooth and reflective. Use a blending stump, tissue, or even a soft brush to create seamless transitions between tones. This is particularly important around the sides of the nose and where it meets the cheek.
- Underside Emphasis: Pay close attention to the underside of the nose. This area, between the nostrils and just beneath the tip, typically forms a V-shape of darker tone. This crucial shadow helps lift the nose off the face and defines its lower plane.
Shading Specifics: Nailing the Details
Even though you're thinking broadly, certain areas demand specific shading considerations:
- Nostrils: These are often the darkest points on the nose. However, they aren't uniformly black. Typically, they are darkest at the top and lighten slightly towards the bottom. A useful trick: fill the nostrils with a flat, medium tone initially. This helps you spot and adjust their overall shape and placement more easily before committing to the deepest darks.
- The Bridge and Tip: The bridge often presents as a rounded, oval form. How light catches its surface defines its curvature. The sphere of the tip will have a strong core shadow and highlight, clearly indicating its roundedness.
- Soft Edges, Defined Form: While you want soft transitions, the nose still has a defined form. Resist the urge to draw hard outlines around the entire nose. Instead, let the contrast (or lack thereof) between the nose's shaded areas and the surrounding skin define its edges. Where the nose meets the cheek, for instance, the edge should be incredibly soft, allowing the skin to flow naturally. Conversely, the edges of the nostrils or the tip might have slightly more definition, but still without a stark outline.
Perspective Power: Noses in 3D Space
A nose floating flat on a face looks unrealistic. Perspective brings the nose into three-dimensional space, showing how it recedes, foreshortens, and rotates with the head's position. This is where the "plastic object" mindset truly shines.
- The "Plastic Line": Visualizing Curvature: Don't just think of the nose bridge as a straight line. Instead, visualize a "plastic line" stretching across its entire width, following its curvature in space. This imaginary line helps you understand how light and shadow interact with its undulating surface, whether it's turning away or towards you.
- Mapping the Angles: Before serious rendering, map out the critical angles of the nose. This includes the angle of the tip, the overall shape and tilt of the nostrils, and the curve of the bridge. These angles act as a foundational guide for foreshortening and rotation. When sketching, establish the 3D form by treating the tip and side wings as ellipses, which naturally convey rotation and depth.
- Foreshortening and Rotation:
- Foreshortening: When the nose is pointing towards or away from you, certain parts will appear shorter or compressed. The tip might seem closer to the face, and the nostrils might appear more oval than teardrop.
- Rotation: As the head turns, the nose's forms will shift. The side facing you will appear wider, while the side turning away will narrow. Understanding the underlying geometric shapes helps immensely here – a sphere rotated in space still looks like a sphere, just viewed from a different angle.
Exaggeration for Impact: Finding the Nose's Personality
Exaggeration isn't just for cartoons (though it's certainly a staple there—for more on that, check out All about cartoon noses). It's a powerful tool in any advanced artist's arsenal, allowing you to amplify features for character, emotion, or storytelling.
- Why Exaggerate?
- Character: A long, pointy nose can suggest curiosity; a broad, flat one, earthiness; a strong, aquiline nose, authority.
- Emotion: Fleshing out the wings of the nose can emphasize a sneer, while a slight upward tilt can convey innocence.
- Storytelling: In a narrative piece, an exaggerated nose might be a visual shorthand for a specific personality type or even a plot point.
- Subtle vs. Bold: Exaggeration doesn't always mean turning a nose into a caricature.
- Subtle Exaggeration: This involves slightly enhancing a natural characteristic. Perhaps a nose has a gentle bump; you might make it a touch more prominent to add personality without losing realism. Or, if someone has slightly wider nostrils, you might emphasize that just enough to make them more distinct.
- Bold Exaggeration: This is where you intentionally distort or magnify features significantly to create a strong, often humorous or dramatic effect. Think about the iconic noses of historical caricatures.
- Connecting to Underlying Forms: When exaggerating, always remember your foundational geometric shapes. If you want a longer nose, think about elongating the primary triangle or stretching the oval of the bridge. If you want a wider nose, expand the spheres of the tip and the flanking triangles of the nostrils. This ensures your exaggeration still feels structurally sound, even if it's fantastical.
Common Pitfalls & How to Avoid Them
Even with advanced techniques, certain traps can derail your nose drawings. Being aware of them is half the battle.
- The "Floating" Nose: This happens when the nose looks like it's simply stuck onto the face, rather than emerging from it. This is often due to a lack of subtle shading where the nose meets the cheeks and forehead. Ensure gradual transitions and soft edges.
- Harsh Outlines: A common beginner's mistake, carrying hard outlines into advanced work is detrimental. Noses are soft flesh. Let value changes, not lines, define their form.
- Ignoring Structure: Skipping the initial geometric breakdown means your nose will lack underlying form, making shading and perspective look arbitrary. Always start with the foundation.
- Over-Blending: While smooth transitions are good, over-blending can obliterate important planes and details, making the nose look muddy or flat. Know when to stop blending and when to reintroduce crispness.
- Lack of Tonal Variation: If your shading is all the same mid-tone, your nose will lack depth. Ensure you have a full range from your lightest highlights to your darkest shadows.
Refining Your Noses: The Final Touches
The journey from initial sketch to finished nose requires patience and meticulousness. The "final touches" aren't an afterthought; they're the culmination of your technical skill and observational prowess.
- Balance Values: Step back and assess the overall balance of light and dark. Are your highlights bright enough? Are your shadows deep enough? Does the nose stand out from the face appropriately? Adjust as needed, ensuring a cohesive look.
- Seamless Blending: Go over your transitions again, ensuring they are as smooth as possible, especially on the bridge and sides. Remember to maintain a light hand to prevent harsh lines from reappearing.
- Erase Unnecessary Guidelines: Once your forms are established and shaded, carefully erase any remaining structural guidelines. This cleans up the drawing and allows the rendered forms to speak for themselves.
- Refine Details and Edges: Look at the nostrils again. Are they teardrop-shaped? Are they distinct from the nose outline? Are the upper curves of the nose soft and natural? Small adjustments here can make a significant difference.
Taking Your Noses from Good to Great: Practice and Observation
Mastering advanced techniques for drawing noses isn't a destination; it's a continuous journey of observation and practice.
- Study Real Noses: Look at people around you, in magazines, and online. Pay attention to how light falls on different nose shapes, how angles change their appearance, and what subtle characteristics make each nose unique.
- Draw from Life: There's no substitute for drawing from a live model or even your own reflection. This trains your eye to see complex forms and subtle tonal shifts.
- Experiment with Mediums: Try charcoal for deep, velvety shadows; pastels for soft, nuanced blends; or ink for sharp, expressive lines. Each medium offers a different approach to rendering form.
- Break Down References: When using a photo reference, consciously break the nose down into its geometric shapes, map its light and dark areas, and consider how you might exaggerate certain features to enhance the drawing's narrative or character.
By approaching the nose with this structured, three-dimensional mindset and diligently applying advanced shading, perspective, and exaggeration techniques, you'll not only draw more realistic noses but also imbue them with personality and depth that truly elevates your art.