Drawing cartoon noses can feel like an intimidating step when you're first learning to sketch characters. How do you capture personality, expression, and even a hint of realism with just a few lines? Forget the complexity; this comprehensive guide offers Step-by-Step Drawing Guides for Cartoon Noses Made Easy, breaking down the process so you can confidently bring your characters to life. We're going to explore not just how to draw a nose, but why certain shapes work, empowering you to draw any cartoon nose you can imagine.
At a Glance: Key Takeaways for Drawing Cartoon Noses
- Start Simple: Begin with basic curved lines and shapes to establish the nose's form before adding details.
- Three Core Parts: Think of every nose, cartoon or real, as having a bridge, a ball, and nostrils.
- Context is King: A nose doesn't exist in a vacuum; draw it in relation to other facial features and expressions.
- Simplify and Exaggerate: Cartooning is about distilling reality. Learn when to omit, when to emphasize.
- Practice Shading: Use multiple shades to give your cartoon nose depth and make it pop off the page.
- Experiment Freely: Once you know the "rules," break them! Play with shapes, sizes, and styles.
Why the Nose Matters (Even in Cartoons): Beyond Just a Bump
Think about it: a nose isn't just a bump in the middle of a face. It's a crucial component that anchors expressions, contributes significantly to a character's overall look, and can even convey personality. A small, button nose suggests innocence, while a long, pointy one might imply mischief or wisdom. Even when highly simplified, the nose communicates a lot about your character.
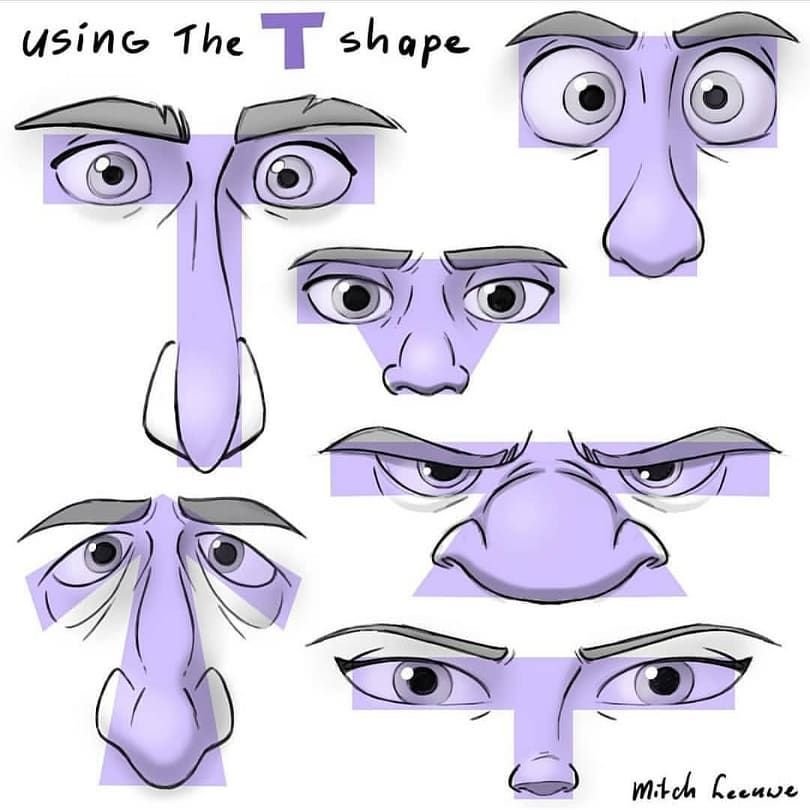
Before we dive into the specific steps, it helps to understand a little bit about what we're drawing. Even for the most abstract cartoon styles, artists often "review the rules so they can more effectively break them," as one expert puts it. This means having a basic grasp of real nose structure is incredibly helpful. The nose is typically composed of three main parts:
- The Bridge: The part that runs down from between the eyes.
- The Ball (or Tip): The rounded end of the nose.
- The Nostrils: The openings for breathing, often accompanied by the ala (the fleshy part on either side).
These regions have depth and can be thought of as simple planes, even if you’re only drawing them with a few lines. On a face, the nose usually sits about two-thirds down, but this is highly flexible in cartoons. Understanding these fundamental parts gives you a mental framework, making it easier to simplify or exaggerate them creatively. For a deeper dive into the nuances of facial anatomy and how it translates to your art, you might find it useful to Learn more about cartoon noses and their various forms.
Your First Cartoon Nose: A 6-Step Guide to Getting Started
Let's start with a foundational cartoon nose, one that's common and provides a great base for future experimentation. This method focuses on building the nose with simple lines and shapes, gradually adding detail.
Step 1: Lay the Foundation with a Gentle Curve
Begin by drawing a single, elegant curved line. This line will form the initial bridge and the gentle slope of the nose's tip. Pay attention to its specific form; it's not just any curve, but one that begins to define the character of your nose. Is it a soft arc or a more pronounced hook? This first line sets the stage.
Step 2: Define the Base and First Nostril Edge
From the lower end of your initial curved line, extend it to create the base of the nose. As you draw this extension, also begin to sketch the leading edge of what will become the right nostril. Focus on the angle and subtle curve here. This line connects the tip of the nose to its underside, giving it structure.
Step 3: Outline the Left Nostril
Now, move to the left-hand side of your drawing. Add a distinct, rounded shape that will outline the left nostril. Notice how its angle and curvature might differ slightly from the right side you just started. These small differences add naturalism even to a cartoon.
Step 4: Shape the Right Nostril
Next, turn your attention back to the right side. Outline the other nostril. This one will typically be larger and more rounded than the left, effectively "surrounding" the curvy line you drew in Step 2. Its placement is crucial for creating a sense of dimension. Think of it as cradling the initial line.
Step 5: Complete the Nostril Openings and Add Minor Details
With the outlines in place, it's time to add the actual holes of the nostrils. Draw curved lines underneath your previously outlined shapes to represent these openings. They don't need to be perfect circles; slight asymmetries add character. This is also a good moment to add any small facial details that complement the nose, like tiny freckles on the bridge or a subtle crease where the nose meets the cheek. Remember, even subtle additions can dramatically impact how your cartoon face communicates, which is a key step towards mastering facial expressions in your characters.
Step 6: Bring it to Life with Color and Shading
The final step in this foundational guide is to add color and shading. This is where your cartoon nose truly gains depth and comes alive. Don't just pick one flat color!
- Layer Shades: Start with the lightest shade near the center of the nose, typically on the bridge and tip where light would hit most directly.
- Gradual Darkening: Gradually introduce darker shades as you move outwards, especially underneath the nose and inside the nostrils.
- Experiment with Mediums: Whether you're using digital tools, watercolors, or colored pencils, experiment with how different mediums allow you to blend and layer colors for the best effect.
This multi-tonal approach creates the impression of shape and volume, making your nose appear three-dimensional instead of flat. If you're looking to refine your technique, exploring basic shading techniques can significantly elevate your finished artwork.
Beyond the Blueprint: Mastering Stylization and Expression
Once you've got the basic steps down, it's time to truly make these cartoon noses your own. This is where understanding the underlying concepts of simplification and exaggeration, as detailed by experienced artists, comes into play.
Simplifying for Impact
Cartoon styles thrive on simplification. Instead of drawing every anatomical detail, you're distilling the essence of the nose into its most recognizable form. This might mean:
- Contours Only: Using just a few lines to imply the nose's shape, often omitting the bridge or only showing one nostril.
- Omissions: In highly stylized or minimalist characters, the nose might be represented by a simple dot, a dash, or even just the space between the eyes and mouth. The viewer uses their preconceived ideas about nose appearance and placement to "fill in the blanks."
The Power of Exaggeration
Exaggeration is a cartoonist's best friend. It allows you to push expressions, alter proportions, and inject personality.
- Shape & Size: Elongate a nose for a mischievous character, squish it for a shy one, or make it broad for a hearty individual.
- Squash and Stretch: Just like other parts of the face, the nose undergoes "squash and stretch" during expressions. A scrunched-up nose for disgust, flared nostrils for anger, or a stretched nose as part of a wide grin can dramatically enhance your character's emotion.
Drawing in Context: The Nose Isn't Alone
This is perhaps one of the most crucial insights: the nose isn't an independent island on the face. It works in concert with other facial features.
- Basic Proportions: When drawing a stylized nose on a face, always start by laying out basic, stylized face proportions. The nose should feel integrated into the overall structure of the head. Experimenting with different head shapes can drastically alter how a nose is perceived.
- Three-Dimensional Space: Even in simplified forms, consider the nose's three-dimensional space. Breaking it into basic shapes (like a sphere for the ball, a wedge for the bridge) helps you think about how light hits it and how it projects from the face.
- Interaction with Other Features: A smirk will affect the cheeks, which in turn will cause the nose to subtly move with them. Frowning can pull the bridge down. Always refine your nose drawing while keeping the eyes, mouth, and overall head shape in mind.
Bringing Your Nose to Life: Advanced Techniques for Character
Now that you have the tools for both basic construction and conceptual understanding, let's explore how to truly elevate your cartoon noses and integrate them into compelling characters.
Personalize Your Noses
The beauty of cartooning is that you're not restricted by reality.
- Shape and Size: Modify the nose's shape and size endlessly. Is it thin, thick, long, short, hooked, upturned, broad, narrow, bumpy, smooth? The possibilities are infinite.
- Skin Tone: Experiment with different skin tones or even fantastical colors if your character isn't human.
- References: Don't be afraid to base your cartoon noses on real people, animals, or even inanimate objects for inspiration. The goal isn't realism, but inspiration.
Add Distinctive Details
Small details can add layers of personality and uniqueness.
- Moles or Pimples: A simple mole can make a character more relatable or quirky.
- Distinct Nostril Features: Maybe the nostrils are unusually wide, narrow, or asymmetrical.
- Accessories: A nose ring, a bandage, or even a pair of tiny glasses perched on the bridge can define a character.
Integrate into a Full Character
A cartoon nose truly shines when it's part of a complete character.
- Full Face Integration: Expand your drawing to include the rest of the face – eyes, mouth, head. How does the nose's shape influence the expression in the eyes? Does it sit comfortably above the mouth?
- Body and Props: Add limbs, props, and put your character into a pose or scenario. The nose is just one piece of the puzzle that makes the character feel alive and complete. This holistic approach is fundamental for developing your own character style that feels cohesive and authentic.
The Art of Exaggeration: Crafting Unique Noses for Unique Faces
This is where you truly embrace the "cartoon" in cartoon noses. Exaggeration isn't just about making things bigger; it's about pushing the boundaries of realism to communicate more effectively, or simply to create humor and charm.
- Pushing Expressions: If your character is angry, don't just flare the nostrils a little – make them dramatically wide, almost snorting! If they're disgusted, scrunch the nose up so much it practically disappears.
- Altering Proportions: Experiment with making the nose disproportionately large or small compared to the rest of the face. This can be a cornerstone of caricature, where specific features are emphasized for comedic or defining effect. Understanding these principles can be a game-changer, especially when diving into caricature drawing tips.
- Abstraction is Your Friend: Play with abstraction and simplification to the extreme. Could a simple triangle be a nose? What about two dots? How little information can you provide while still having the audience recognize it as a nose? The key is to consider how the drawing communicates to your audience.
Common Questions About Cartoon Noses, Answered
"How do I make my cartoon nose look 3D?"
The illusion of 3D comes primarily from shading and line weight. Use darker lines on the underside or shadowed parts of the nose, and lighter lines for areas facing the light. Employ multiple shades of color, as discussed in Step 6, to create gradients that suggest form. Also, remember that the nose often protrudes from the face, so drawing it slightly overlapping other features (like the cheek line) can enhance its three-dimensional quality.
"Should I always draw nostrils?"
Absolutely not! Many cartoon styles, especially simpler ones, omit nostrils entirely. A line or two indicating the ball or tip of the nose is often enough for the viewer to understand it's a nose. In fact, omitting them can sometimes make a character appear more innocent or less aggressive. Only include them when they add to the character's expression, age, or specific style.
"How do I prevent my noses from looking all the same?"
The best way to avoid repetitive noses is to experiment constantly and use diverse references.
- Experimentation: Doodle many different nose shapes and sizes in a sketchbook without judgment. Try drawing them from different angles.
- References: Look at real noses on people, in magazines, or online. Pay attention to how different nose types (hooked, button, aquiline, upturned) appear. Then, try to simplify and cartoonify those real-world examples.
- Character-Driven Design: Design the nose for the character. What personality traits does the character have? What emotion are they currently feeling? Let these factors influence the nose's shape and how it's drawn.
Your Journey Starts Here: Embrace the Wiggle and the Wobble
Learning to draw cartoon noses isn't about perfectly replicating a specific tutorial every time. It's about understanding the underlying principles and then having the confidence to play, experiment, and develop your own style. Every artist, no matter how seasoned, started with hesitant lines and shapes that didn't quite look right.
So, grab your pencil or stylus. Don't be afraid of the "wiggle" or the "wobble" in your lines. Break down complex facial expressions into smaller, manageable steps. Remember that practice isn't just about repetition; it's about mindful exploration. Keep drawing, keep observing, and most importantly, keep enjoying the process of bringing your unique characters to life, one fantastic cartoon nose at a time.